Customer favourite since 2005
Worldwide delivery to 100+ countries
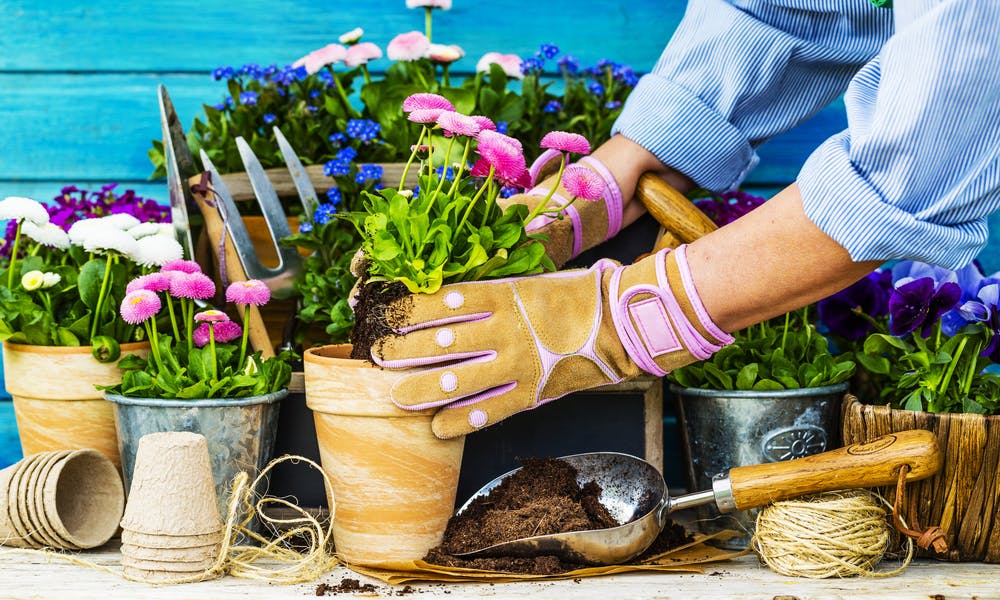
Potting or repotting your plants do take a little time and knowledge. The process is not difficult but it can be tricky. If one of your plants has outgrown its current pot or you are adding a new plant to your decor, there are are few things to bear in mind.
When you repot a plant, you do not necessarily do it to change the container. Potting for the first time or repotting is most often done to ensure the plant has fresh potting soil. New potting soil is full of nutrients. If your current planter is fine, simply changing the soil is all you need to consider. However, if you are going to upgrade the size of the container, it is a good idea to increase by a couple of inches. When plants are moved to a larger pot, there is a tendency to water more often. This is not a good idea. A small plant going into an oversized pot with plenty of soil, plus overwatering is a recipe for disaster. This is the way many beautiful plants are killed. They are killed with kindness.
This article covers:
* When is it time to repot?
* What is needed?
* Steps to potting or repotting
* Caring for freshly potted plants
Several things indicate it is time to repot. If you notice the roots are growing out of the drain hole in the bottom of the pot, or you see the roots are pushing the plant up and out of the pot, it is time to repot. Other indicators include growth. If the plant seems to have stopped growing, or is growing slower than usual, repot it. You may notice that the soil dries out more quickly than is usual. You may also see a build-up of salt and minerals on the plant.
These are typical things to look out for. Typically, plants need to be repotted every year or year and a half. The time frame all depends on how active the growth is. Some plants are slow growers. They can stay in the same pot for years. Although a slow-growing plant does not necessarily need a larger pot, it is necessary to replace the soil periodically. The best time to replace soil is in the spring. This time of year is the beginning of the growing season.
It is a good idea to get everything that you need to pot your plant before you begin the process. Clean your potting bench, put any old soil in a bucket or other container. This old soil can be added to your outdoor garden or compost heap later.
Always wear a pair of suitable gardening gloves when you are handling soil of any type. When you purchase potting soil, the soil should be the type recommended for the plants you are potting. Get a pot or pots of the right size and proportion. You need a small hand trowel or shovel, screening material, secateurs to trim any excess foliage or root, and water.
Whether you are potting a plant for the first time or repotting a plant, the steps are the same. One important reminder, do not mix old potting soil with new. Use fresh potting soil straight from the bag. Once you have completed the job, seal the bag of soil tightly.
Several steps need to be taken to ensure your plant thrives in its new environment.
* Cut a small section of screening material. Place this over the hole in the bottom of the pot.
* Add an inch and a half to two inches of fresh potting soil to the pot. If you are using an old pot, make sure it has been washed thoroughly, making sure all traces of old soil, roots from the previous occupant, and salts have been eliminated.
* Hold your hand over the top of the pot that currently holds the plant. Upend the pot and tap the rim on the edge of your potting bench. The slight vibrations tend to loosen the plant so it can easily be removed. If you have to “tease” the plant out of the pot, be careful. You do not want to damage or disturb the roots. Once the plant is out of the pot, cut away any dried or twisted roots.
* Now that the root ball has been properly prepared, place it in the center of the new pot. If you are planting several plants in a window box, place them where you want them to grow.
* Add fresh potting soil to the container until the plant is secure. If the plant appears to be sitting too deep in the pot, remove it and add more mix. Repeat this process until the plant seems to be at the right level.
* Add potting soil, but do not pack it into the container. To ensure a healthy plant, the roots must breathe. Leave a little space below the top of the plant pot. An inch or so is sufficient. Do not fill the pot with soil to the brim. It is be difficult to water the plant properly if you do.
* Pick up the newly potted plant. Tap it a few times on the bench to settle the new soil. Tapping also removes any air pockets that may be around the roots. Do not pack the soil too firmly.
If you pot or repot a plant when the weather is quite mild, water the plant about once a week. As the temperature builds up in the summer months, plants require more water. The heat tends to evaporate the water before the plant has a chance to use it. Plants also need additional water as they become larger. Hanging plants may need watering a couple of times a day as the soil is exposed to the air.
Add water until it comes out of the drain hole. This is a good indicator that the soil is wet from top to bottom. Always water the soil, not the leaves. Wetting the foliage can result in a plant fungus.
Potted plants require more fertilizer than plants in the garden. The more water that is added, the quicker the fertilizer nutrients are washed out. For healthy plants, consider using a water-soluble fertilizer every two or three weeks.

