Customer favourite since 2005
Worldwide delivery to 100+ countries
If you enjoy DIY projects, you would know that some projects can be relatively simple to accomplish. While finding a straightforward DIY project is easy, the same cannot be said for a DIY project that is simple and fun at the same time.
This is where scented candles come in; an endless possibility of candles to customize, and you can do so without breaking a sweat. Scented candles are sweet little gifts to give out, sell, or decorate your home with. The best part is that you don’t need to break the bank to make candles; the materials required are affordable and can be easily acquired.
Are you suddenly in the crafty mode or searching for an easy but thoughtful gift for a loved one? You have come to the right place. We are going to take you through the steps of making a scented candle and turn you into a professional candle maker.
In this article, we are going to address the following points
* The history of candle making
* The items required to make a candle
* Basic steps for making candles
Before electricity, human beings depended on candles for thousands of years as an essential source of light for their home, place of worship, and business. Candles were created independently in different locations throughout history, but candles owe their existence to the Romans. The Romans started making candles around the year 500 BC with tallow wax.
This wax was procured from the meat of sheep or cows before it was fashioned into candles. Early candle making can also be traced to the Qin Dynasty in China around 221 BC. The candles used by China was made out of whale fat or beeswax.
However, scented candles can be first traced to India, where they used boiled cinnamon and yak butter to make candles. These resulted in scented candles, and it was mostly used during worship. Although candles were in demand back in the day, this changed with the invention of electricity. Now, most people purchase candles for decoration or to add a pleasant scent to their homes.
If you are new to candle making business, there are some supplies you need to have in your arsenal. It isn’t compulsory to purchase everything at once; you can start small and expand your supplies as you grow. Here are the important material you must have:
Wax: you can choose between a container wax or a pillar wax. Go for either a container wax if you intend to put the wax in a jar, or a pillar wax if you want the candle to stand on its own.
Dye: liquid dye and dye blocks can both be used to add color to your candles.
Fragrance oil: the wax you are using for your candle naturally has an odor, so you might want to add a scent. All you have to do is choose from an assortment of fragrance oil, crosscheck that it is sufficient, and you are good to go.
Wick: a decent candle largely depends on your wick; a wick that isn’t good can affect how your candle burns. The kind of wax or the quantity of oil can influence the performance of your wick.
Thermometer: a thermometer is required for measuring the temperature of your wax.
Saucepans: this is required for melting your wax.
A heat source: you must use a stove or hot plate to melt your wax.
A scale: a scale is needed for weighing your wax and fragrance oils.
A container or seamless mold: If you intend on using a pillar wax, you can use a seamless mold. For a container wax, you can make use of a transparent or non-transparent container depending on your preference.
Random supplies: to protect your hands, you can purchase latex gloves or get disposable towels to cover your working area.
First things first, pick out a working area and clean it before you start crafting. Make sure the working area has been cleared out to avoid destroying anything with wax. Now that you have done that, its time to begin
Step 1: Measure Your Wax
Measure the amount of wax you would need. The amount of wax should be based on the container you intend to use.
Step 2: Melt Your Wax
Fill a saucepan with water and start heating it in the stove. Then pour your wax into a smaller saucepan and place it in the boiling water carefully, let no water enter the wax-filled saucepan. Let your wax sit for about 20 minutes; however, this time depends on the quantity of wax. A larger amount of wax may require more time to melt.
Step 3:Add Your Fragrance Oil
After your wax has melted, add your fragrance oil and stir. The amount of fragrance oil added must in accordance with the instructions on the wax packet. This is to ensure you don’t add too much or too little fragrance oil. This step can be skipped if you are not interested in making a scented candle.
Step 4: Place your wick
Attach your wick to the bottom of your container. To make your wick stick, you can dip the base into the wax before attaching it. Let the wick rest for a couple of minutes to harden.
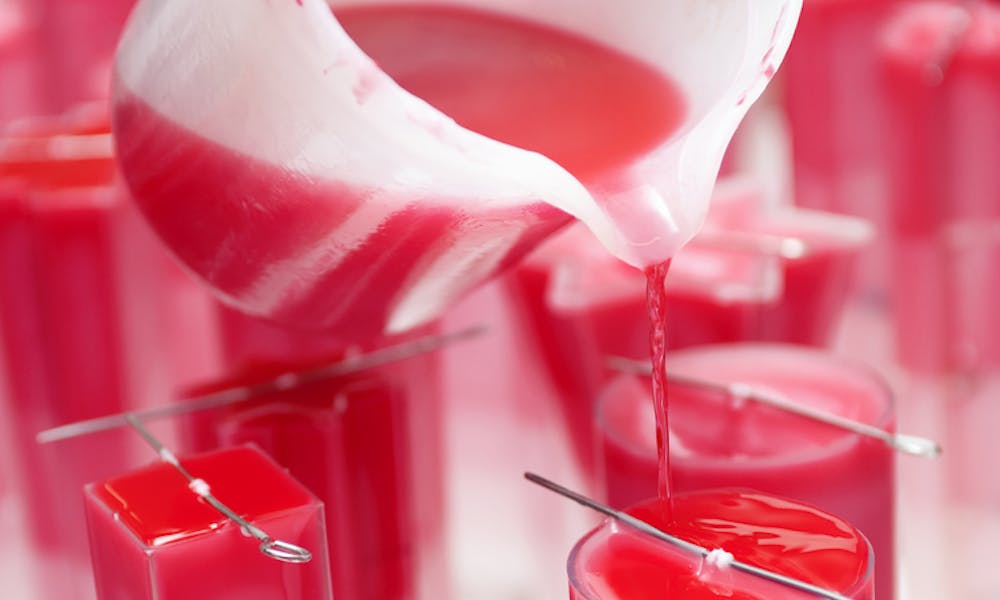
Step 5: Add Your Wax
Let your wax cool, and when the temperature gets to 140 degrees on your thermometer, you can pour the wax into the container. Make sure you lightly hold the wick in place as you slowly pour the wax in.
Step 6: Secure The Wick In Place
You can place a chopstick or pencil across your container and wrap the exposed wick around it. This is to prevent the wick from sinking while the wax is solidifying.
If you want to design your candle or make it more unique, you can simply add dried petals to the side of the container before you pour in your wax.

