DIY With Flowers: Floral Hair Slide

Welcome back to our DIY With Flowers series, where we have been showing you how to make your own homemade floral decorations and accessories. This week, we will show you how to make your own floral hair slide, which is perfect for a special occasion such as a wedding, or even just a spring or summer party.
What do you need?

We try to make sure that our instructions are easy for anyone and everyone, so the equipment we suggest to use is the most basic possible. We recommend using the following equipment when you make your floral hair slide:
- A hair slide
- Shears (although scissors will do just as good a job)
- Thin wire, or if you can’t find any, string
In terms of flowers, we will tell you what we have used in our example here and our pictures, but you can feel free to adapt and change it however you want! Here’s what we used:
- Lisianthus
- Baby’s breath
- White phlox
We’ve gone for a white and bright theme, perfect for a wedding or summer party, but you may wish to mix and match colours to make it stand out even more.
Instructions
Step 1: Prepare the HAIR SLIDE

The first step of the process is to prepare the slide. The best way to do this is to wrap your metal wire (or string) around the first few teeth of the slide, so that it gives the wire or string a strong base and your flowers won’t simply fall off when you attach them and the weight increases.
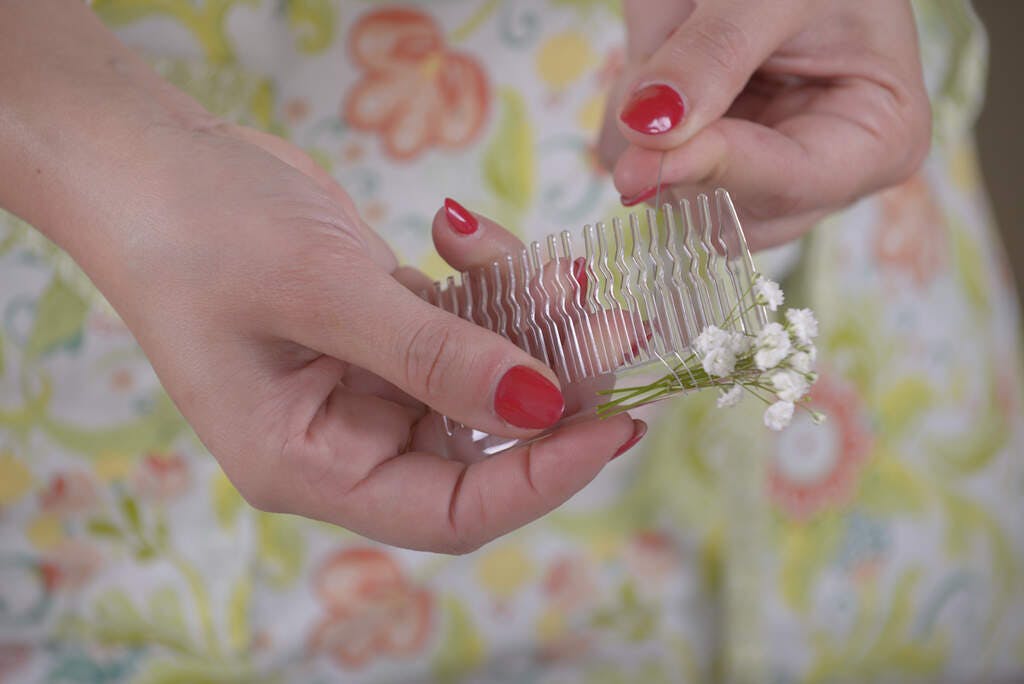
Step 2: Prepare the flowers

Next up, place your smaller flowers alongside the top edge of the slide, as shown above. We recommend using baby’s breath in this step as it is the perfect size to get started with and will add a great dimension to your floral hair slide.
Fun fact: Some species of baby’s breath are used as ingredients in cheeses and ice creams.
Step 3: Start to put the pieces together
Then begin to bind the flowers to the slide. To do this, continue to wrap the wire around the top edge, only now around the flowers which you have placed there too. This may look complicated, but it is surprisingly simple!
Step 4: Keep going, then add more flowers

This is where things get a bit more interesting as you add some bigger and more noticeable flowers, such as the lisianthus that we have used here.
To add this flower, first cut the stem of the flower so that it is only slightly longer than the slide, if at all. Then, place it along the top edge of the slide, like with the baby‘s breath, only this time slightly further down. Then continue to wrap the wire around the flowers and teeth of the slide until it is attached.
Be careful to avoid the flower if possible when wrapping the wire around the stems and slide, the best way to do this is to wrap underneath the flower until you reach the stem, and then go over the extra stem too.
Fun fact: Lisianthus means ‘bitter flower’, owing to the taste of the flowers. They were traditionally used in herbal medicine which is why people know how they taste!
Step 5: Add even more flowers

Carry on with the process as before. here we’ve added some more baby’s breath to add more depth to the floral hair slide. You can of course mix and match colours or types of flowers to bring your slide to life and make sure that you really stand out at the special occasion.
Step 6: Add the finishing touches

Here, we have added some white phlox to our floral hair slide to really put the cherry on the cake. This is also a good idea to fill out your hair slide and make it look bigger and better. This way, you are sure to sparkle!
You can do this, and add other flowers, in the opposite direction to those that we have previously added. If you choose to do so, it makes sure that the hair slide looks complete.
Fun fact: Some species of phlox are believed to have been around for over 120,000 years and survived numerous ice ages.
Step 7: Tie it all together

Now that we have all of the flowers, you can tie the wire around the final tooth of the hair slide to close it. When doing so, make sure that there is no sharp wire sticking out if using metal wire, as this could be uncomfortable. One way to reduce the risk of this is to wrap some tape around the end of the wire so that it is less sharp.
Step 8: Look great and take care!

Put your hair slide on and you’ll look great! Make sure to be careful and gentle with it, as like all flowers, this is a delicate accessory. If flowers are damaged, then you can always swap them for new, fresh flowers. We hope you enjoy the occasion and that your floral hair slide helps to make you stand out from the crowd!
Thank you for reading our DIY With Flowers series! Next week, we will show you how to make a stunning bridal bouquet, perfect for the big day of any bride. In the mean time, why not check out our international flower delivery service to over 90 countries worldwide, to help you make someone’s day by sending flowers?

