Customer favourite since 2005
Worldwide delivery to 100+ countries
Flowers are a beautiful addition to any home or garden. Unfortunately, they only last so long. Fortunately, there is a way to preserve their beauty. This is done through pressing flowers. This is a tried and true way to keep flowers well past their expiry date.
Pressing flowers is most commonly done to preserve a flower with sentimental value. Perhaps they are the flowers from your wedding, from the bouquet from your first Mother’s Day, or from the flower from your first date. No matter your reason, there are a few methods for pressing flowers. Some methods are a little easier than others, while some methods are a little quicker. Choose the way that works best for you. Or even consider trying a few different techniques until you find the one that works best for you.
In this post, we discuss:
* Preparing for pressing
* Pressing in a book
* Pressing using an iron
There are a few common things to consider, no matter which method you choose. Firstly, try to choose flowers with a flatter surface, like a daisy. A rose, which is very round in its growth habit, can work but requires more preparation. A rose-like flower needs to be cut in half with very sharp scissors or pruners, and then the half can be pressed.
Try to choose blooms that are fresh on the plant. If you are cutting them from your garden, try picking the flower in the morning, after the dew has evaporated. If you are choosing them from a bouquet, pick the flowers that stand up the straightest on their own. The goal is to select the healthiest looking flower.
If you cannot press the flower right after cutting, do your best to keep it fresh for as long as possible. This can be accomplished by sealing the bloom in a Ziploc bag. Put the bag in the fridge until you have the time to press the flower.
While it is acceptable to press flowers without any preparation, you are better off to do a few simple steps to make the process as successful as possible. The idea is here is to plump up the flower by hydrating it right before pressing. You only need to hydrate the flower for a few hours. To do so, cut the base of the stem under running water. Cut the stem on an angle to allow for the most possible water to be absorbed. From here, trim off any foliage remaining on the stem. It is okay to leave some leaves but make sure they are not submerged in water. Put the flowers in a vase with water and a teaspoon of sugar. The sugar helps to feed the plant one last time. Place the vase somewhere in the house that is out of the way of direct sunlight. If possible, try to make it a cool space. After a few hours, the flower is ready to press. If you are using a thicker flower, like the rose, now is the time to cut it in half.
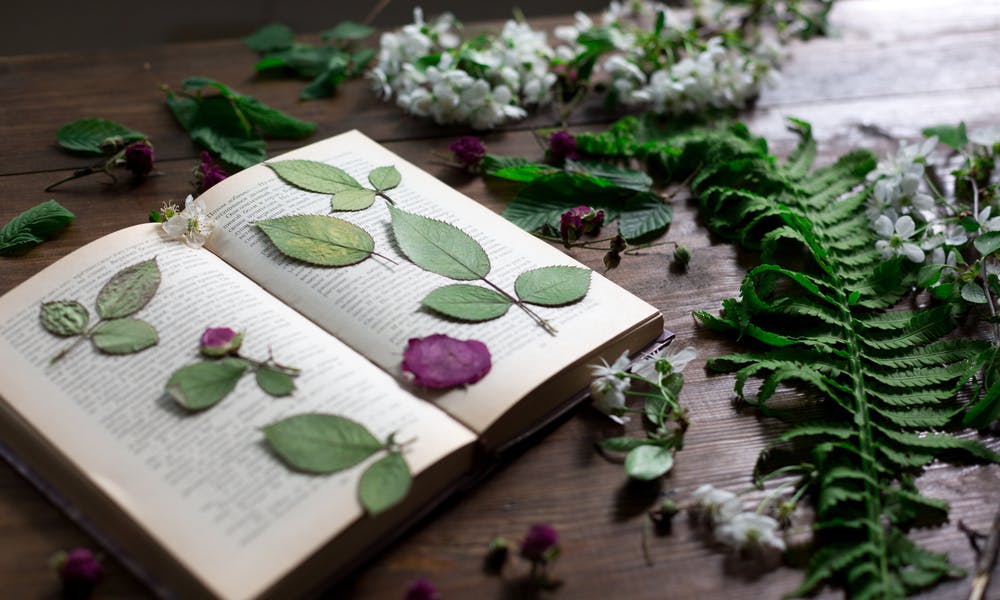
<h2>Pressing in a Book</h2>
A straightforward way to press flowers is to do so with a heavy book. The first step is to wipe any excess moisture from the stem. Please the flower between two pieces of paper. Parchment paper or cardboard works well for this. Open the book and place the papers with the flower inside. Close the book. If the book is thick enough, it is possible to press numerous flowers at once. Store the book under the weight of other books for at least 10 days. Check on flowers every few days to see if the pieces of paper need to be changed due to excessive moisture. Dried flowers are quite delicate, so be very careful when removing them from the pages. Using tweezers to pick up the flowers may be the best way to do this.
Waiting over 10 days for pressed flowers may be too long for you. If this is the case, try using an iron to press the blooms. The iron should be completely empty of any water. The point is to remove water from the flower, so adding any during the drying process is counterproductive. Put the flower between two pieces of paper and use something heavy, like a book, to quickly flatten the flowerhead. Remove the paper from under the book and turn on the iron. Keep the iron at low heat. Overheating the flower may cause it to burn. Firmly place the heated iron on the paper. Hold it in place for 15 seconds then remove the iron. Allow the paper to cool for another 15 seconds. Replace the iron once more for another 15 seconds. Again, allow the paper to cool for 15 seconds. After this, check the flower to see if it has dried out. Repeat the process until the bloom is completely dry. Again, the flower is going to be quite delicate, so be very gentle when picking it up. You may prefer to leave it in its paper for several minutes before taking it out.
This method is quite effective, but it takes some practice to get right. If you find you are having trouble, try switching the type of paper you are using. Also, every iron is different, so you may need to leave the iron on for a longer or shorter period.
The iron method draws the moisture out of the flowers quickly. Due to this, the paper used to press the flowers needs to be somewhat absorbent. Printer paper, cardboard, or even coffee filters work well for this. Do not use a paper towel, though. While it may seem like a good idea, the texture on the paper towel can get transferred to the flower petals, ruining the integrity of the pressed flower image.
Pressed flowers make for beautiful keepsakes. Consider putting pressed flowers in a frame or shadow box so they can be displayed for years to come.

